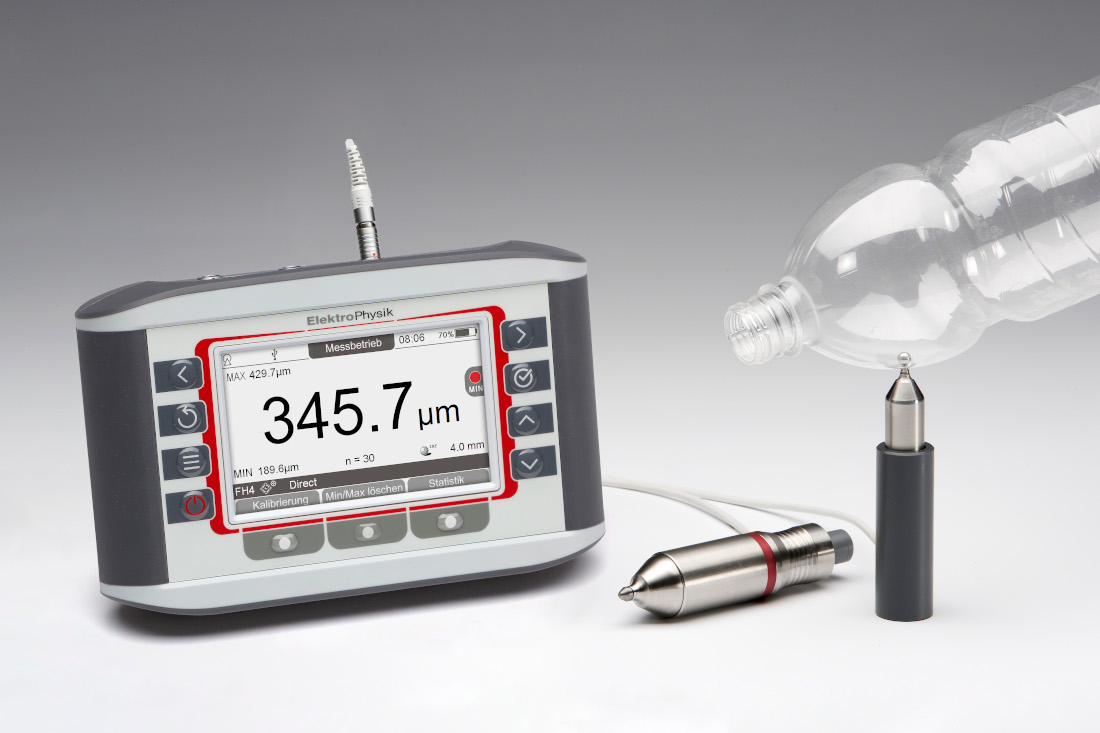
MiniTest FH
Professional, high-end wall thickness measuring system for non-destructive measurement up to 24mm. The MiniTest FH offers straightforward thickness measurement of non-magnetic materials such as glass, synthetic material, stainless steel and composites. Components with complex geometries can also be measured with ease.

We are happy to assist
finding the best measuring solution for your specific application as well as with all questions concerning coating thickness measurement in general and also non-standard measuring tasks, calibration, quality requirements and much more. It is a pleasure for us to share our experience of more than 75 years with you.

Konstantin Kill
Technical support
konstantin.kill@elektrophysik.com
Product infomation
MiniTest FH: Making wall thickness measurement more convenient
An intelligent SIDSP sensor enables the MiniTest FH to provide high-precision measurement and reproducibility while compensating for the influence of temperatures in the measuring environment and in the object being measured. A wide range of sensors allows to adapt to different applications and measuring tasks.
The MiniTest FH functions as follows: Thickness is determined by measuring the distance of a reference ball or wire to the sensor tip. The reference ball is attracted by a powerful magnet positioned directly behind the sensor tip. The steel target balls are treated according to a specialised ElektroPhysik procedure which allows reproducibility of test results of up to 0.5%.
Special features such as an automatic calibration function for zero calibration and direct transfer of readings into a spreadsheet or CAQ system complement the high user comfort provided by the intuitive menu operation.
Application
- Non-magnetic materials like synthetic materials, glass, ceramic, non-ferrous metals…
- All kinds of hollow items like bottles, aluminium cans, glass and plastic containers with complex geometries…
- Thermo-moulded parts like cups, cans, bowls…
- Die-cast and moulded plastic parts, fibre compound materials, non-ferrous metals etc., for e.g. in the automotive field (gear casing, body and interior components), in avionics (turbine components, combustion chambers, high-pressure pipes), in the medical field…
Features
- High precision wall thickness measurement up to 24 mm
- Exceptional accuracy and repeatability through sensor-integrated digital signal processing (SIDSP®)
- 2 million readings storable in more than 200 batches
- Up to 20 readings per second
- Wear-resistant sensors with hardened sensor tips
- Direct data import into evaluation software
- Bluetooth, USB and RS 232 C interfaces
- IP 65
Supply schedule - basic unit
- MiniTest FH basic unit
- Solid plastic case for transport and storage
- 8 AA NiMH batteries (integrated, chargeable via USB)
- USB connection and charging cable
Supply schedule - sensor types FH4
- sensor FH4 and FH4_90°
- 3 precision standards (approx. 0.25 mm, 1 mm and 3 mm)
- Measuring stand for FH4 sensor (spring-loaded for straight version only)
- 1 pack of 100 steel balls 1.5 mm Ø
- 1 pack of 100 steel balls 2.5 mm Ø
- 1 pack of 50 steel balls 4 mm Ø
- Zero calibration standard for the 1.5 mm, 2.5 mm and 4 mm balls respectively
- Supply schedule – sensor FH4 M and FH4 M_90°additionally
- 1 precision standard (approx. 8 mm)
- 1 pack of 20 magnetic balls 1.5 mm Ø
- 1 pack of 20 magnetic balls 3 mm Ø
- Zero calibration standard for the 3 mm balls
- sensor FH4_1
- 4 precision standards (approx. 0.15 mm, 0.25 mm, 1 mm and 3 mm)
- Measuring stand for FH4 sensor (spring-loaded for straight version only)
- 1 pack of 100 steel balls 1.o mm Ø
- 1 pack of 100 steel balls 1.5 mm Ø
- 1 pack of 100 steel balls 2.5 mm Ø
- 1 pack of 50 steel balls 4 mm Ø
- Zero calibration standard for the 1.0 mm, 1.5 mm, 2.5 mm and 4 mm balls respectively
- Supply schedule – sensor FH4_WIRE
- 3 precision standards (approx. 1.5 mm, 3.0 mm and 8.0 mm)
- 1 pack of 20 target wires 0.66 mm Ø
- 1 pack of 10 target wires 1.15 mm Ø
- Zero calibration standard for the 0.66 mm and 1.15 mm target wires
Supply schedule - sensor types FH2
- sensor FH2 and FH2_90°
- 3 precision standards (approx. 0.25 mm, 0.5 mm and 1.5 mm)
- Measuring stand for the FH2 / FH2_90° sensor (spring-loaded version for FH2 only)
- 1 pack of 100 steel balls 1.5 mm Ø
- 1 pack of 100 steel balls 2.5 mm Ø
- 1 pack of 50 steel balls 4 mm Ø
- Zero calibration standard for the 1.5 mm, 2.5 mm and 4 mm balls respectively
- Supply schedule – sensor FH2 M and FH2 M_90°additionally
- 1 precision standard (approx. 3 mm)
- 1 pack of 20 magnetic balls 1.5 mm Ø
- 1 pack of 20 magnetic balls 3 mm Ø
- Zero calibration standard for the 3 mm balls
Supply schedule - sensor types FH10
- sensor FH 10
- 3 precision standards (approx. 1 mm, 3 mm and 8 mm)
- Spring-loaded measuring stand for the FH 10 sensor
- 1 pack of 100 steel balls 2.5 mm Ø
- 1 pack of 50 steel balls 4 mm Ø
- 1 pack of 25 steel balls 6 mm Ø
- 1 pack of 10 steel balls 9 mm Ø
- Zero calibration standard for the 2.5 mm, 4 mm, 6 mm and 9 mm balls respectively
- Supply schedule – sensor FH 10 M additionally
- 1 precision standard (approx. 18 mm)
- 1 pack of 20 magnetic balls 4 mm Ø
- 1 pack of 20 magnetic balls 6 mm Ø
Probe FH2 & FH2-90°
- FH2 Probe: 0 mm – 0,6 mm with 1,5 mm reference ball
- FH2 Probe: 0 mm – 1,3 mm with 2,5 mm reference ball
- FH2 Probe: 0 mm – 2,3 mm with 4,0 mm reference ball
Measurement uncertainty:
- FH2 Probe: 0 mm – 0,6 mm± (3 μm + 1% of reading)
- FH2 Probe: 0 mm – 1,3 mm± (5 μm + 1% of reading)
- FH2 Probe: 0 mm – 2,3 mm± (10 μm + 1% of reading)
- FH2 Probe: 0 mm – 2,0 mm± (20 μm + 2% of reading)
- FH2 Probe: 0 mm – 4,5 mm± (40 μm + 2% of reading)
Probe FH2M & FH2M-90°
- FH2 Probe: 0 mm – 2,0 mm with 1,5 mm magnetic ball
- FH2 Probe: 0 mm – 4,5 mm with 3,0 mm magnetic ball
Measurement uncertainty:
- FH2 Probe: 0 mm – 2,0 mm± (20 μm + 2% of reading)
- FH2 Probe: 0 mm – 4,5 mm± (40 μm + 2% of reading)
Probe FH4 & FH4-90°
- FH4 Probe: 0 mm – 1,3 mm with 1 mm reference ball
- FH4 Probe: 0 mm – 2,0 mm with 1,5 mm reference ball
- FH4 Probe: 0 mm – 3,5 mm with 2,5 mm reference ball
- FH4 Probe: 0 mm – 6,0 mm with 4,0 mm reference ball
Measurement uncertainty:
- FH4 Probe: 0 mm – 1,3 mm± (3 μm + 1% of reading)
- FH4 Probe: 0 mm – 2,0 mm± (3 μm + 1% of reading)
- FH4 Probe: 0 mm – 3,5 mm± (5 μm + 1% of reading)
- FH4 Probe: 0 mm – 6,0 mm± (10 μm + 1% of reading)
Probe FH4M & FH4M-90°
- FH4 Probe: 0 mm – 5,0 mm with 1,5 mm magnetic ball
- FH4 Probe: 0 mm – 9,0 mm with 3,0 mm magnetic ball
Measurement uncertainty:
- FH4 Probe: 0 mm – 5,0 mm± (20 μm + 2% of reading)
- FH4 Probe: 0 mm – 9,0 mm± (40 μm + 2% of reading)
Probe FH4-Wire (Wire measurement) & FH4CC (Interchangeable cap)
- FH4-W Probe: 0 mm – 7,0 mm with 0,66mm ø measuring wire
- FH4-W Probe: 0 mm – 13,0 mm with 1,15mm ø measuring wire
- FH4-CC Probe: 0 mm – 6,0 mm mit 4,0 mm Referenzkugel
- FH4-CC Probe: 0 mm – 5,0 mm mit 1,5 mm Magnetkugel
Measurement uncertainty:
- FH4-W Probe: 0 mm – 7,0 mm± (3 μm + 1% of reading)
- FH4-W Probe: 0 mm – 13,0 mm± (5 μm + 1% of reading)
- FH4-CC Probe: 0 mm – 6,0 mm mit 4,0 mm Referenzkugel
- FH4-CC Probe: 0 mm – 5,0 mm mit 1,5 mm Magnetkugel
Probe FH10 & FH10M
- FH10 Probe: 0 mm – 4,0 mm with 2,5 mm reference ball
- FH10 Probe: 0 mm – 7,0 mm with 4,0 mm reference ball
- FH10 Probe: 0 mm – 10,0 mm with 6,0 mm reference ball
- FH10 Probe: 0 mm – 10,0 mm with 9,0 mm reference ball
- FH10 Probe: 0 mm – 16,0 mm with 4,0 mm magnetic ball
- FH10 Probe: 0 mm – 24,0 mm with 6,0 mm magnetic ball
Measurement uncertainty:
- FH10 Probe: 0 mm – 4,0 mm± (5 μm + 1% of reading)
- FH10 Probe: 0 mm – 7,0 mm± (10 μm + 1% of reading)
- FH10 Probe: 0 mm – 10,0 mm± (20 μm + 1% of reading)
- FH10 Probe: 0 mm – 10,0 mm± (20 μm + 1% of reading)
- FH10 Probe: 0 mm – 16,0 mm± (40 μm + 1% of reading)
- FH10 Probe: 0 mm – 24,0 mm± (60 μm + 1% of reading)
Wall thickness gauge: MiniTest FH
Non-destructive thickness measurement of non-magnetic materials and even complex geometries up to 24mm wall thickness.


